Connecting to Allen-Bradley PLCs - DF1
This article is all about connecting your computer to Allen-Bradley PLCs with serial communications. Particularly, the DF1 serial protocol from A-B.
The DF1 protocol is usually used when you connect a RS-232 cable from your computer to a PLC. The typical RS-232 cable uses a 9-pin connector as shown below:
Now, to be honest, A-B doesn’t even make PLCs with serial ports anymore. Most newer PLCs have a USB port and an EtherNet/IP port. But there are still a lot of older PLCs out there that have a serial port so this training will probably come in handy for you at some point ;)
Plus, having a good understanding of how to set up communications from your PC to your PLC with the serial protocols will help when you need to use other communication options such as Ethernet and USB.
So, if you remember from part 1 of this series (back in December 2019), there are 4 basic steps to connecting to any Allen-Bradley PLC:
- You need to choose and connect some sort of cable between your computer and the PLC. That could be a serial cable or a USB cable with some of the more modern controllers, or it could be ethernet or even something else.
- You need to set up your computer so that it's ready to connect to the PLC. So if you're connecting over Ethernet that means setting the IP address on your computer, or if you're talking over serial or USB, you may need to configure the comm port that you're connected through.
- You need to set up your PLC for comms and some PLCs are not set up to communicate with your computer out of the box. So there may be some things you have to do with the PLC before you can connect to it.
- Configure a driver in RSLinx to talk to that specific PLC over the specific protocol you're going to use, whether it's Ethernet, DF1, or USB.
Ok, so now check out this video video on how to set up communications using a RS-232 serial connection using the protocol called DF1.
Connecting to Allen-Bradley PLCs with DF1
Prefer to read it? Go ahead...
Hey there guys. It's Stephen Gates here with my PLC training.com and you've got another video today to help you become a confident PLC programmer. So in this video we're going to look at how to connect your computer to a PLC, the old school way, which is using an RS-232 serial cable.
Thankfully we don't need serial cable connections as much anymore since we have Ethernet and USB on most new controllers. But you still may need to connect to an older PLC using a serial connection. So let's start here.
So remember from part one, the four steps we need to follow to get connected to a PLC are as follows.
Step 1: choose and connect to cable between your computer and the PLC. This might be a serial cable or USB or Ethernet. In our case, it's going to be a serial cable.
Step 2: set up your computer so it's ready to connect to the PLC. This might mean setting an IP address on your computer or configuring a comm port for serial USB or other communication types. In this case, we just need to make sure the comm port gets configured.
Step 3: set up your PLC for comms. So some PLCs have dip switches or settings that you have to adjust. Um, in this case we shouldn't need to do anything, should be ready out of the box.
And then Step 4 is to configure your driver in RSLinx.
Okay, let's jump right in. Step one, this one's pretty easy. First, grab your RS-232 serial cable to connect from your PC to a PLC. So if you have a computer that's newer than 10 years old and you probably do not have a serial port, but that's okay because there's a lot of USB to RS-232 adapter cables that you can buy for 20 bucks or less.
So, this is what I've got here. This is the serial side or the RS-232 side. And there's the USB. So most PLCs with RS-232 ports have the classic DB-9 connector port, which looks like this. Get this cable ready for your controller.
Most people have seen this. It's the classic DB-9 port. So you most likely need a USB to RS-232 adapter that has a DB-9 connector on the end, but you also need a null modem cable or a way to switch your PLC adapter or to switch your adapter to a null modem connection.
So what's null modem? Basically all it is is a serial cable with a couple of the pins that are swapped from end to end. So instead of a cable like this, or each pin on one end is wired to the corresponding pan on the other end, there is one pair of wires that is swapped pin two and three.
So it's not critical that you remember how null modem cables work. You just need to know that you may need one when attempting to communicate to an Allen-Bradley PLC.
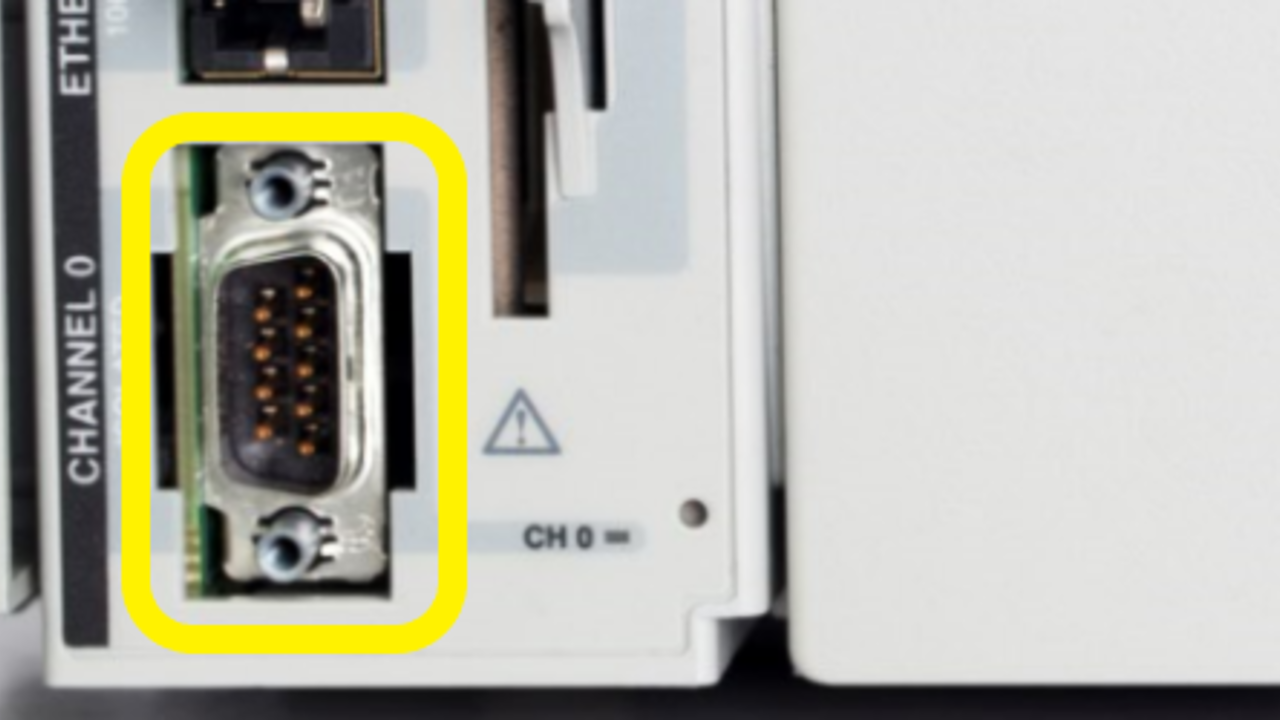
So in my case, I have a MicroLogix 1100 PLC that I want to connect to. So I plug in my USB-to-serial adapter. Now one thing about this MicroLogix 1100 is that it needs a mini din connector instead of the classic DB-9. So this cable that I just showed you converts from the DB nine to the mini din connector.
So I'll go ahead and plug this in to the PLC and then I'll plug in my USB-to-serial adapter and computer. You can hear it chirping at me.
So that is step one. We've got the cable connected.
Step two when you plug in your serial cable on most windows PCs or shouldn't be much to do, your computer should see it and automatically download. Install the correct hardware driver for your USB to serial cable to make sure it does.
I recommend being connected to the internet when you plug the cable in for the first time. That way your computer can go out searching and retrieve the correct driver. If it does not automatically install the driver, then you'll have to determine what kind of cable you have and go manually search for and download the correct driver.
But for the purpose of this video, we will assume your driver automatically installed. Okay, so now that the driver is installed, we can confirm where the computer thinks it's connected by opening up the device manager.
So if you have windows 10, the best way to do this is just to open up the start menu and type in the device manager. Utilities should show up here. Just click it to open it up. So from here we want to go to comm ports or ports. And we can see we have an item here called USB serial port and it's been assigned to comm.
Depending on your cable you might see something a little bit different here, but it should be descriptive. USB to RS-232 or something here to show you that you've plugged in your cable and it should assign a number. COM 3, COM 4, COM 15...it depends.
Okay, so step three is to prepare the PLC to communicate with your computer, but usually there isn't much to do here. And this case is no different. The PLC should be ready to go out of the box to communicate over RS-232
So let's move to step four.
So now we're ready for the final step to get your PC ready to communicate with the PLC. And that's to set up the correct RS links, classic driver. So I'm going to open up RSLinx Classic
And then we're going to go to communications and configure drivers. So as you can see there are quite a few driver types that you can choose from. And basically that means there's a lot of different types of communication cables and protocols available to connect to the different Allen Bradley PLCs.
And actually, with some PLCs, you can use two or three different of these types, like this MicroLogix, 1100 which can be connected using Ethernet, one of these two drivers or it can be connected to using RS-232 DF1 but some PLCs can only be connected using one of these drivers.
So there are three things that will determine which are RSLinx drivers will work for you. Number one, it depends on what type of communication ports you have available in your computer. Number two, what types of ports are available on the PLC?
And finally, number three, what communication cables or adapters you have available to connect between the two. So again, in our case we'll use the DF1 driver cause we have an RS-232 connection from the computer to the PLC. So we'll add new and we'll go with the default name.
So now that we've selected it, we'll need to configure the driver. So the first thing to configure is the comm port. So earlier when we looked at Device Manager, we determine that our USB serial port was connected to COM 3. So from this COM PORT drop-down menu we'll choose COM 3.
Next for the device type we need to figure out which device matches our MicroLogix controller. So it starts on PLC channel zero which would be for connecting to a PLC-5 and some random devices that are more secure. Here we have a CompactLogix devices. This one is SLC channel zero slash Micro slash
PanelView. So /Micro includes the MicroLogix. So that's the one we want to choose. So now we just need to select auto configure to make sure it's ready to go. And that's what you want to see. Auto configuration successful.
If you don't get that, you may have the incorrect cable or you may not have a no modem cable that's converting the pins. The way you need to to connect to the PLC could be a number of different things. But at the end of the day you want auto configuration successful.
Okay, now that it's configured, we'll click okay. Close this and we'll open up RSWho, which you can do here is click on this icon and we should see our new driver here. A- B DF1.
If we expand it, we can see, we can see our MicroLogix 1100 and the controller name is Ethernet because I was doing a demonstration with the Ethernet connection. Um, so there it is. All right, so now that we know where we're communicating, we can actually go online with it and do a download or an upload. So let's open up a project in RSLogix Micro.
So we're going to open up a simple project and we'll download it to the controller. Okay, so RSLogix is open and I'll just open up a recent project here. So we have an input driving an output on one rung.
We have just an XIC and OTE, pretty simple project there. So now we'll go to comms "who active go online" so we can see what controllers are available. And we should see the same thing we saw in RSLinx are us who expand the DF1 driver. Now that's available, click on the controller. Click. Okay.
So now we actually just went online with this controller. So we didn't do a download, because it already had the same project in it. But we could download it. We'll go offline here. And then obviously there's not really a need to download the same project in. But just to give you an example here, so we'll click comms and then system comms, select our controller under the DF1driver and choose download
...downloading a program called Ethernet on the offline program and we're downloading it to a MicroLogix, which has an Ethernet program already in it. But we're going to download anyway. That's okay. Yes,
Switch to program mode. Yes, we want to go online
And there we go.
So in the next video, we'll look at connecting to the same MicroLogix controller except with Ethernet. And remember that connecting the steps for connecting to a MicroLogix controller are very similar to the steps for connecting to a ControlLogix or CompactLogix controller.
And if you liked this video and you're interested in getting more free training, that will help you become a confident PLC programmer. Be sure to check the link below to get your free cheat sheet on the three things you need to know to understand any PLC system. Thanks for watching and we'll talk to you next time.
Get the Free PLC Cheat Sheet
PLCs are really not that complicated. If you are new to PLCs or just looking to get a better handle on how they work, check out this free cheat sheet, called the "Motivated Electrician's Guide to Understanding ANY PLC System."


New to PLCs?
You can breeze through this cheat sheet in about 10 minutes and get a solid understanding of the big picture of how PLCs work. Perfect place to start.
Recent Posts