Connected Components Workbench (CCW) - Math Instructions in Ladder Logic
This post is all about using Ladder Logic for programming in Connected Components Workbench.
If you are new to Connected Components Workbench, I'd encourage you to check out the intro to CCW post here.
Specifically, we are going to take a look at using math instructions in Ladder Logic to do calculations within CCW.
For example, let’s say we wanted to track the liquid level in a tank as a percentage. In many cases, the analog input for a tank level sensor might be scaled such that it shows the gallons of the tank.
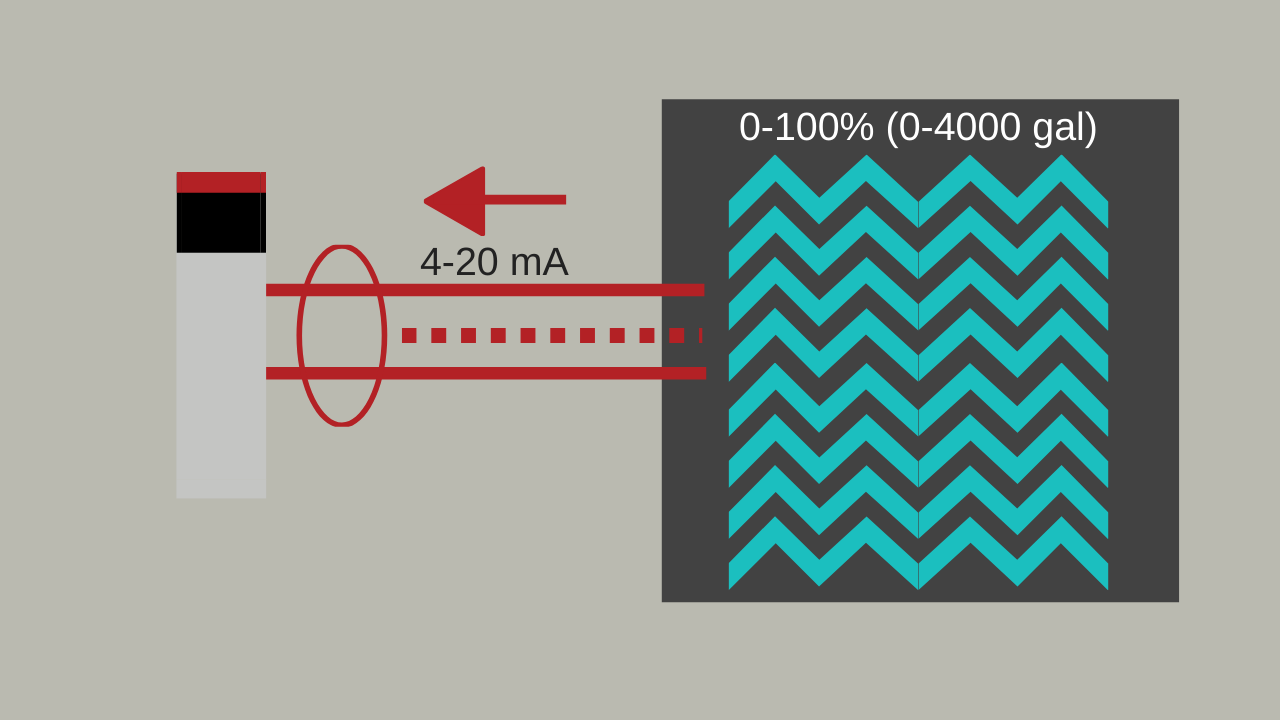
So if it’s a 4,000 gallon capacity tank with a 4-20mA sensor, the analog input may already be scaled such that the PLC analog input tag sees the 4-20mA value in terms of 0-4000 gallons, which is good. But, sometimes you just want to work with simple percentages.
So we could do a simple calculation to convert the 0-4000 gallon value into 0-100%
In other words, scale the value again to convert from gallons to percentage.
The calculation is simple enough:
Analog_Input (in gallos)/4000 x 100 = Tank Level Percentage
Now watch the walk-through video on how to set up that math inside CCW using math ladder logic instructions.
Enjoy the video.
(Now before we get started, I should tell you that if you’re new to CCW then you'll want to check out our other videos on Connected Components Workbench)
Connected Components Workbench - Math Instructions
Prefer to read it? Go ahead.
Hey guys, Stephen Gates here with myPLCtraining.com and I've got another video for you to help you become a confident PLC programmer and a confident automation professional.
So this video is another one on Connected Components Workbench, otherwise known as CCW.
And what we're going to look at specifically is using math instructions and ladder logic within CCW. I'm opening up a project here that I started and we are going to walk through, some basic logic. As this is loading, let me set the stage for you. What we are going to do in this video is convert a analog input signal---let’s delete all of this, so we can start from scratch.
We're going to convert an analog input signal from gallons to percentage and we're going to use the simulator to test it. And we are going to run through this pretty quickly.
So I'm not going to take much time to explain each thing. We're just going to run through it. The beautiful thing about videos is you can speed them up or slow them down on YouTube. You can rewind, pause, all that stuff. So please make use of that and we're going to jump right in here. So first let's start with our controller. We have a Micro850 SIM.
And just quick side note, if you're totally new to CCW, I recommend you check out one of our other videos. We have a couple other videos, one where we introduced CCW and another where we introduced the simulator, both of which we're going to be using.
Okay, so here we have our controller hardware layout and as you can see there are these areas on the controller where you can plug in modules and you can see it highlights these plugin module areas here.
So what I've done is I've added an analog 2080 IF4 analog input module. You can see the description there, there's a basic configuration. You can choose voltage or current. I've got it on current. So that's what we've got set up here.
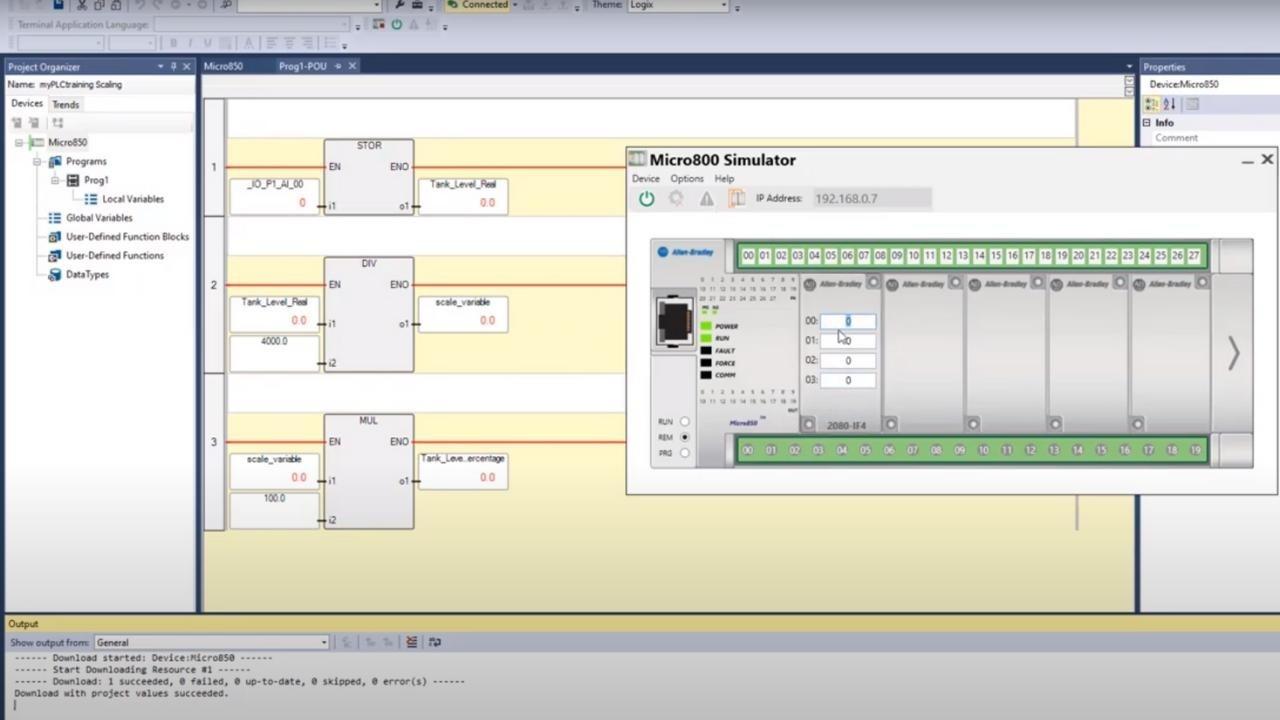
Now let's go to our default program here. This is the ladder logic program. So like I said, we're going to convert gallons to percentage. And the equation to do that is you take the analog input divided by the max amount of gallons in the tank and then you multiply that times 100 to give you a percentage.
So for instance, if you get a signal that tells you have 2000 gallons in a 4,000 gallon tank, that would be 2000 divided by 4,000 would give you 0.5 multiply that times a hundred that gives you 50 for 50%, okay? So we're going to do those calculations here in the ladder logic.
So what we want to do is use the math instructions here and but before we do that, there is one annoying thing we have to do here and I'll explain that here in a minute. We need to use this store instruction. This converts any variable to a REAL variable.
If you're not familiar with data types, a REAL is a floating point type, meaning it's data that's represented with a number including the values after the decimal point. And the analog input value doesn't come in in that format. So we need to convert it to that format first.
So I clicked on that instruction (STORE). Now what we need to do is add or find the analog input that we're going to be reading and working with. So if we go to IO Micro850, let me scroll down to the bottom.
You can see we've got these I/O or AI, I should say 00. So this is I/O addresses P1 stands for plugin 1. AI stands for analog input, 00 is the zero channel on that module. I've given it an alias calling it “Tank_Level” and the data type is a UINT, which is an unsigned integer.
So that's the guy we want to use. And then we need to convert this to a REAL. So I created a tag here earlier called Tank_Level_REAL and I selected data type REAL entered the name there. Very simple. Click Ok.
All right, so now we've converted our tank level from a UINT to a REAL, so that's good. Let's add another couple of rungs here. So now we need to divide by the max capacity of the tank, which in our example is 4,000 so find the divide instruction.
And we are going to use this Tank_Level_Real. So, Tank_Level_REAL is the one we want. And then here we just want, I dunno if it's going to let me, there we go.
We want to divide that by 4000.0 and that's going to be a scaling variable. Okay, so I'm going to create a new tag just so you can see me do that. I double click it on the lower part there and we'll call this scale variable.
Now we choose data type REAL because it needs to be the same data type as the other ones that we're using in our divided instruction. Click Ok.
Okay, that's perfect. And then lastly I think this is lastly. So we divided by 4,000 we have our temporary scaling variable so now we need to multiply that times 100 so we can use a multiply instruction. Again, we're on this math tab for the instructions. Grab the multiply instruction there.
Scale variable. This is the one I just created and the one we are using here. So we want to make sure it's the same one there.
So we're multiplying this scale variable x 100.0 and then lastly, we're going to put that into another tag. Again, I've created this tag already called Tank_Level_Percentage. It's a data type real, okay, we are in good shape. Now let's build the project and make sure everything is acceptable in our logic. Okay? Build one, succeeded zero, failed, zero up to date, zero skipped. So that's all good.
Now we bring up our simulator, which you can bring up here. I already had it running and the first step is to synchronize the module configuration. Yes, I actually don't even know what that step does, but Rockwell says to do it. So I do it. Okay. Um, next we want to turn the power on.
And lastly, Oh wait, one thing I should mention here can see here, there's an analog input module out. It's not going to let me do this, so I'm going to close it down and reopen it. So you can see this since I did not cover this in the previous video. Here it is. Okay, so I'm going to delete this is what it looks like when you first opened it up and again you can click in these plugin module areas just like you can here. And so we want to add an analog input module and this is really cool.
They let you add this, the same modules that you actually use in the CCW programming software. So, this is different than Studio 5000 and the emulator that comes with that, doesn't have this feature. Anyway, we have that analog module added in our hardware and it's added in our software. So, now we are going to power it on. Next we're going to download the project to the controller. Okay. Now we are going to download the current project to the controller.
Yupp, download with project values. Let's see it downloading project files here, kind of green bar here on the right. Download. One succeeded, that's good. Now we wait for another prompt or two to see if we want to go to run mode. Download is complete, change the controller to remote run to execute controller project. Yes. Awesome.
So let's open up our logic here again and it's not running yet. Once the logic is showing live, you'll see these rungs as red. So let's see if we can refresh that. I'll just close it and reopen it.
so while we were opening that, I'm just going to make a comment about the way we're going to simulate this and that is we're going to use this as our channel zero, which it is, and we're going to put in a value here and see how our calculations work.
So, one thing I want to mention is that the raw data format that you will see in a real system, a real Micro800 controller with a four to 20 milliamp analog input, the raw data that it comes in it as is going to be something different than what we're doing. So, we're assuming that this data is going to come in in a gallon's format, but, uh, in the real world, it may come in in a different format and you have to convert it to gallons in the first place.
But we are skipping that step for this point. But I did want to make mention of that just for future reference. So, let's see if when we change this value, we should see this value change first of all. So, let's change it to a thousand you can see that the value change to a thousand here it's converting it to a 1000.0 and then on the next rung we are dividing a thousand by 4,000.0 and getting our scale variable of 0.25 and then the next rung, we take that 0.25 multiply it times 100 to get 25%
Okay?
So that's exactly what we wanted to do. We'll just try another couple here. 2000 should give us 50%
Sure enough,
50% and 4,000 should give us a hundred percent
100%
Alright, so there you go. A little more instruction on how to use the simulator and, uh, some new instruction on how to use math instructions inside of CCW ladder logic. So hope you found this video helpful. Thanks for watching.
If you want more help becoming a confident PLC programmer, please check out myPLCtraining Academy, which is our membership, where we have courses, we provide support and community with others trying to learn PLCs and automation.
And then we also provide access to software. So check it out if you haven't already, we'd love to have you on the inside there. One note I'll say is that we don't currently have a CCW course inside myPLCtraining Academy yet (training coming later in 2020), but we will be adding training on it soon. And we do cover other Rockwell software platforms such as Studio 5000 and RSLogix Micro.
So hopefully, you found this helpful and thank you for watching. We will catch you next time.
Get the Free PLC Cheat Sheet
PLCs are really not that complicated. If you are new to PLCs or just looking to get a better handle on how they work, check out this free cheat sheet, called the "Motivated Electrician's Guide to Understanding ANY PLC System."


New to PLCs?
You can breeze through this cheat sheet in about 10 minutes and get a solid understanding of the big picture of how PLCs work. Perfect place to start.
Recent Posts