Connecting to Allen-Bradley PLCs - Ethernet
This post is all about connecting to an Allen-Bradley PLC using Ethernet communications.
There are 4 steps you need to take to get your Windows computer talking to an A-B PLC.
Number one, you need to choose and connect some sort of cable between your computer and the PLC. That could be a serial cable or a USB cable with some of the more modern controllers, or it could be ethernet or even something else.
Number two, we need to set up your computer so that it's ready to connect to the PLC. So if you're connecting over Ethernet that means setting the IP address on your computer, or if you're talking over serial or USB, you may need to configure the comm port that you're connected through.
Number three, we're going to set up your PLC for comms and some PLCs are not set up to communicate with your computer out of the box. So there may be some things you have to do with the PLC before you can connect to it.
And then number four, we configure a driver in RSLinx to talk to that specific PLC over the specific protocol you're going to use, whether it's Ethernet, DF1, or USB.
In our case we are going to communicating over ethernet.
But if you want to get familiar with the first couple steps of the process, be sure to check out the two blog posts we did in 2020.
Connecting to A-B PLCs - Intro
Connecting to A-B PLCs - DF1/Serial
Now let's get into the video tutorial for connecting your computer a Allen-Bradley PLC via Ethernet.
Connecting to Allen-Bradley PLCs with Ethernet
Prefer to read it? Go ahead...
Hey there guys it's Stephen Gates here with myPLCtraining.com and I've got another video today to help you become a confident PLC programmer. So in this video, we're going to look at how to communicate with a MicroLogix 1100 PLC via Ethernet, but keep in mind, you can use these same steps to communicate with most ControlLogix and CompactLogix controllers also.
So in case you haven't been following the past couple of videos, here are the steps we need to complete to get communicating with any Allen-Bradley Rockwell PLC.
So number one, choose and connect a cable between your computer and the PLC. This might be a serial cable, or it might be a USB cable or Ethernet or something else. So that's step one.
Step two, set up your computer. So it's ready to connect to the PLC. This may mean setting an IP address on your computer, configuring a comm port for serial, USB or even other communication types.
Number three, set up your PLC for comms. So if necessary, you may need to use the BootP utility to set up an ethernet address or some devices even have dip switches. So those are some things you may have to configure on the PLC before it's ready.
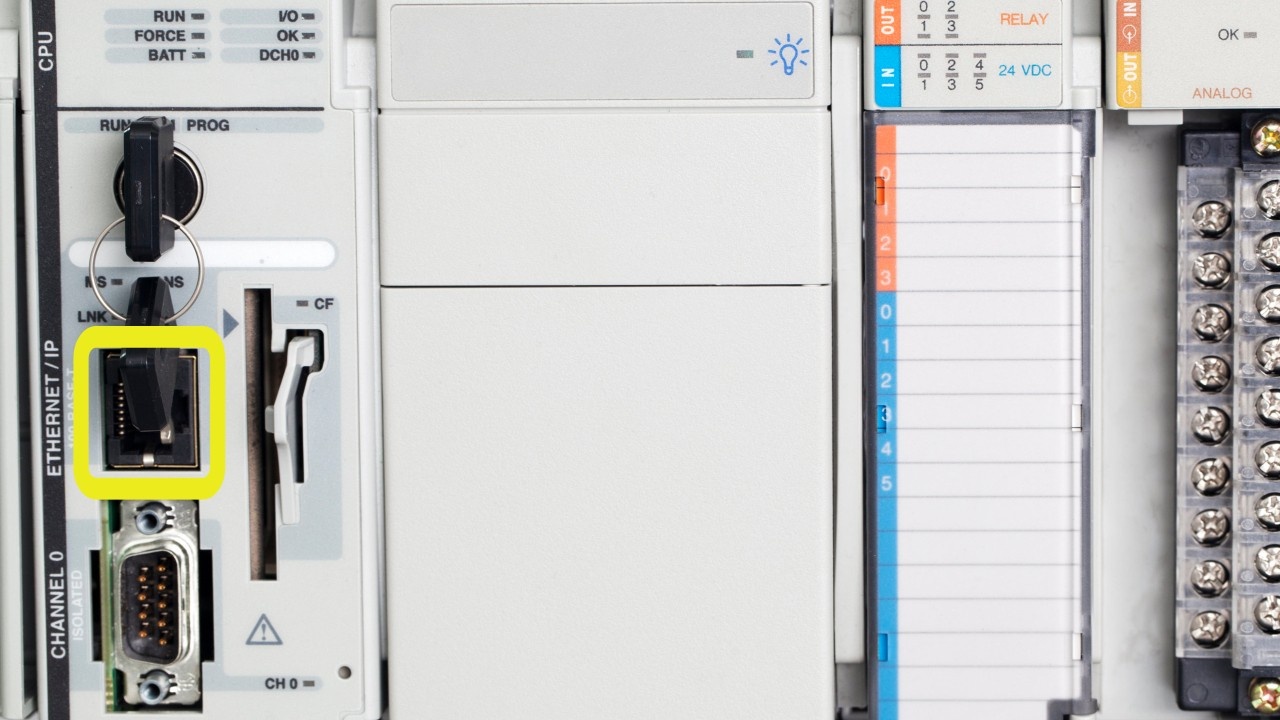
And then number four, configure your driver in RSLinx Classic. So let's jump right into step one for this Ethernet situation. So in this case, we'll be using an Ethernet cable from our computer. This will be a Cat 5 or Cat 6. Um, as you can see in the camera, you can see the MicroLogix has a little cable coming out of it. It's just the basic ethernet cable. And this is going to be connected directly from your computer to the PLC. Or you could go to an ethernet switch and then to the PLC in this case, I'm just going directly from my laptop to the PLC.
So just so you know, a lot of new laptops, these thinner, lightweight notebook laptops don't even have ethernet ports. If that's the case, I recommend getting something like this. I'm going to put it here in the camera. So this is a USB to Ethernet adapter that you plug into your computer and it allows you to have an ethernet port on your laptop.
Okay? So once that's hooked up, let's move on to step two. Now it's time to set up your computer to be able to connect to the PLC. So when connecting to a PLC over ethernet usually need to set up your own computer's IP address.
So find your network icon down here, right? Click and choose open network and internet settings. Now this is for windows 10, and then we're going to look for change adapter options.
Yeah.
So as you can see, we have Ethernet three, and this is saying it's an unidentified network. So to change the IP address of this network, we know this is the one cause that we know it's not wifi and these other ones are disconnected. So it's gotta be this Ethernet three.
So right-click and select properties from there, select internet protocol, version 4, and then go to properties again. And now we can enter a manual or we can manually enter our IP address.
So normally your computer is set up to obtain an IP address automatically also known as DHCP. So your home router or your work route, or would give your computer an IP address, whatever's available. But in this case, we need to set it up for what we want.
So I happen to know that, the IP address of the PLC is 192.168.1.2. So my computer needs to be on the same subnet, which means the first three octets or first three numbers here need to be the same.
So one 192.168.1.x, And then we can make the computer, whatever we want, just so long as it's not the same as the PLC or the same as any other device on the network. So the only two devices on this network are my computer and the PLC. So I'm just going to choose a random number, which is 45 (x=45).
And then if you hit the tab key on your keyboard, it will fill in the subnet mask for you. Okay, so now we just hit, okay. And then close this. So now we're on to step three, which is to set up the PLC for communications.
So you can see our PLC in the little webcam video there towards the bottom, right. And this step of setting up the PLC can take a little time. So I'm going to assume that your PLC is already set up for Ethernet communications. If you want to learn more about how to set it up, you can check out this BootP video up here in the upper left-hand corner that I'm pointing to and will show you how to set it up for this MicroLogix.
Okay. Step four is to open up RSLinx, classic and set up the communication driver there for Ethernet. So we're going to go to communications, select configure drivers, and then the available driver types. If you go down through here, you have Ethernet devices or EtherNet/IP driver, Ethernet devices is when you have to enter the IP address manually of the device or connecting to which is necessary sometimes.
But EtherNet/IP actually usually works better because it finds the device for you. If you're on the same subnet so let's connect to EtherNet/IP driver or select EtherNet/IP driver, and then choose, add new. The default name works for me, click, okay. And then you need to choose which network adapter you're going to use.
And so I'm going to choose the one that has the IP address that I set up because I have all these other, uh, network adapters. And they're not going to be able to see that PLC, but this one will. So we'll choose that click. Okay. Click close. All right. So then we can choose RS who
Expand this, and now we're going to open the new driver. We created the new EtherNet/IP driver and there it is one nine two one six eight.one dot two MicroLogix 1100. So now that guy is ready to communicate with, if we want to download a program.
So I'm going to open up our RSLogix Micro, just so you can get a feel for how this goes with Ethernet. And we'll say ether, just going to make sure it's the same MicroLogix model. So I think it's a series B here, communication settings. We're going to use the AB EtherNet/IP driver. You can always change this later, but we might as well get it here and click. Okay. And we're going to create the world's simplest logic program. Then we're going to verify, and we are going to go to comms who active go online
And we're looking our controller under the AB EtherNet/IP driver. There it is. So we'll click. Okay. Save changes. Yes. And we'll save it to the desktop Upload user file. There we go. Okay.
So we actually uploaded the file from the controller, which was different than the one I was going to download to it. Um, but as you can see, it's basically the same program, except we have a bit here instead of the input. Um, so anyway, we uploaded the program instead of downloaded it. If we want to go offline and reopen the file we just had and then choose download. Let's see, that'll go for us.
No Response. Okay. So we got to choose the right path here. Here's our controller. I'm gonna select download.
There we go.
So now this is the program we created the ether program. We force on this input output turns on and actually hear it in the background. If you listen, Clicking on or it's off right now, click on here it is. And that is how you set up Ethernet communications to MicroLogix 1100 PLC.
So she liked this video and you're interested in getting more free PLC training. Be sure to check out the link below, to get your free cheat sheet on the three things you need to know, to understand any PLC system. Thanks again for watching guys. We'll catch you next time.
Click here to the get the PLC Communication Checklist
Get the Free PLC Cheat Sheet
PLCs are really not that complicated. If you are new to PLCs or just looking to get a better handle on how they work, check out this free cheat sheet, called the "Motivated Electrician's Guide to Understanding ANY PLC System."


New to PLCs?
You can breeze through this cheat sheet in about 10 minutes and get a solid understanding of the big picture of how PLCs work. Perfect place to start.
Recent Posts