How To Set Up a Studio 5000 Logix Designer Project
This is a quick tutorial on how to set up a Logix Designer project. This lesson and many more on Studio 5000 Logix Designer (and RSLogix 5000) are available inside myPLCtraining Academy.
I hope this helps you get started with RSLogix 5000/Logix Designer. If you enjoyed this lesson, you can learn more from the Become a Confident PLC Programmer course inside myPLCtraining Academy:
Click here to find out more about myPLCtraining Academy.
What did you take away from this lesson? What's one thing you can implement right away? Let us know in the comments below.
VIDEO TRANSCRIPT BELOW
Welcome to Module 2. In this module, we are going to be getting into the nitty-gritty programming stuff that you need to learn to become a confident PLC programmer. As you should know by now, the software we will be spending most of our time on will be Studio 5000, Logix Designer. This is the software you use to program Rockwell's primary PAC platforms, control logix and compact logix.
Here's what you'll learn in this lesson. How to create a new project in Studio 5000 Logix Designer. How to set up a program and how to set up a new routine. Routines live in the programs and the routines is where you'll write your logic. So, let's go ahead and jump over to the software and get started.
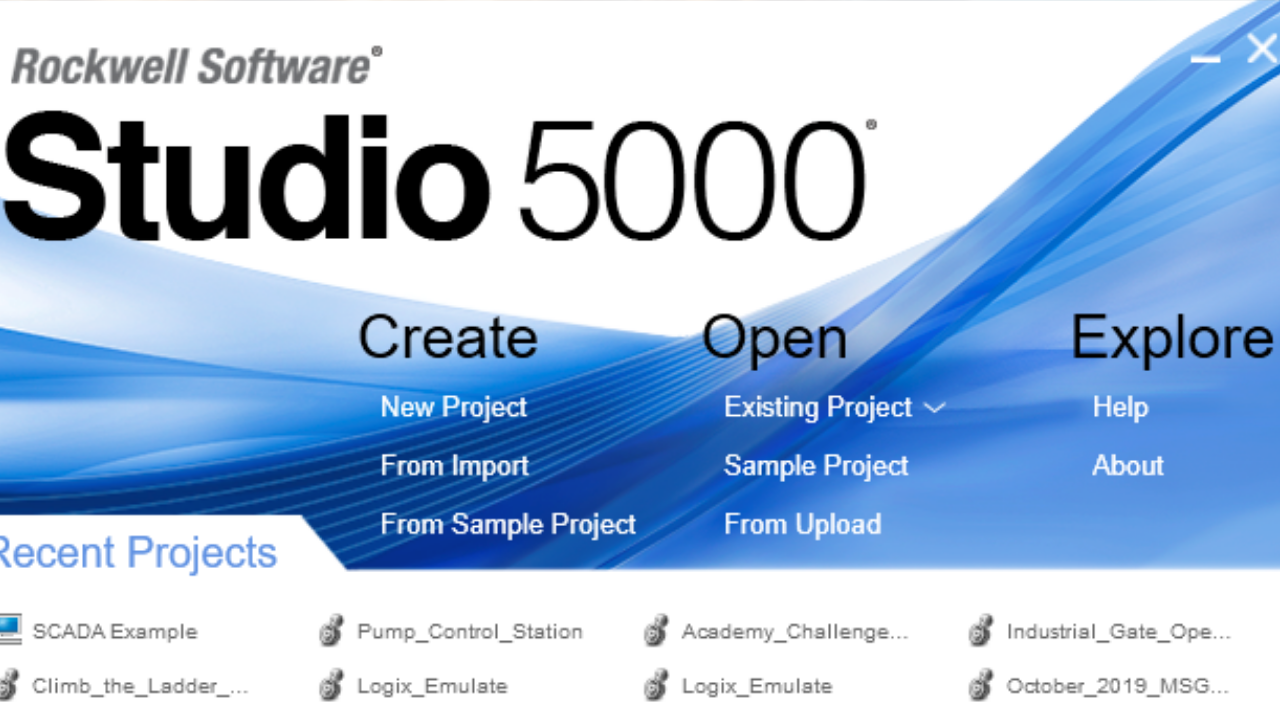
So, once you open up Studio 5000 Logix Designer, under create, select new project. Now, it brings up a list of controllers that we can use for this project. So, you have CompactLogix, Compact GuardLogix, CompactLogix 5380, ControlLogix etc. So, for this lesson let's go to our 5370 CompactLogix controllers and let's select a 1769-L30ER.
And we need to come up with a useful name for this controller. So, for our purposes let's just call it the name of this lesson in this module, so we'll just say BCPP module one, or module two, lesson one. Select next. Next, you'll choose a version of firmware and software that you'll be using for this project. In my case, I have version 24 and 30, I'm just going to select version 30. Let's leave everything else at the defaults and click finish.
All right. Now we're inside the new project that we've created. Let's look at our controller organizer which we talked about at the end of the last module and let's go to our main task and every new project comes with the main task and a default main program and main routine. For now, let's just delete this main program. We're going to start from scratch.
So, within our main task, let's right click add new program. Now you always want to use a name that will help you know what's in this program in the future. So, some companies may have standards on naming conventions but the point is to name it something helpful. So, in this case, we're just going to name it Program 1. Now, select okay.
Okay, there's our new program we've added and every new program comes with this parameters and local tags folder. If we want to add some logic routines, we have to do that manually. So let's do that now. Let's add a new logic routine. Right click add, new routine. As always, let's use a helpful descriptive name. This isn't that helpful. We're not programming this for a specific machines, so we're just going to call it Routine 1. Then, make sure you have ladder diagram selected. In this particular version of software I'm using, that's all I have available. In certain versions of logics designer, you would also have structured text and even sequential function chart and more.
Now, let's choose what type of routine this will be, how it's assigned. So let's pause for a second here and I want you to think back to your days of using RS Logix Micro, or RS Logix 5 or 500, Ladder 2. Do you remember Ladder 2? Whenever you create a new project in RS Logix 5, 500 or Micro, it comes with a default routine called Ladder 2 and this is the routine that always runs. So, no matter what, that routine is going to run. So if you want to run other routines, you have to use Ladder 2 to jump to other sub-routines. So that's like your main routine, Ladder 2.
In our case, we are going to ... In our case, they call the main routine, the main routine. Makes sense, right? So, whichever routine we assign to be the main within this program we've created, that routine will always run. There will not be any need to jump to it from another routine.
So, if we just want it to be a regular routine where the main then jumps to this routine, we would use select none. And fault is for some more advanced type things. In our case, we're just going to use the main, so we know it will run. Click okay.
All right, now we can add some logic to our routine. So let's open up our new routine. Now, let's just grab an XIC and an OTE. Now, we'll get more into the details of this later, but for now, know that whenever you put in a new instruction, if you just want to add the tag name while you're editing here you can just enter whatever name you want. In our case, we'll enter Input 1 and then if you right click, you can select new input or a shortcut key combination that's control plus W. And if will by default, select data type boogle, which is what we need. This is a boolian, right? It can be zero or one. So we'll select create.
Then, for our output, our OTE, let's just call it Output 1. Again, right click, create. There you have it. Now, one nice thing about Logix Designer compared to the older RS Logix 5, 500 and Micro is that whenever you finish creating your logic, assuming there's no errors, it will auto-verify for you so you don't need to go check your ... This is still useful for some things, but they make it easy on you by automatically verifying it if you've entered it right.
All right, there we go. There's some logic in our program already. So this wraps up this lesson. In the next lesson, we will look at adding IO modules in our IO configuration tree. So we'll see you then.
Get the Free PLC Cheat Sheet
PLCs are really not that complicated. If you are new to PLCs or just looking to get a better handle on how they work, check out this free cheat sheet, called the "Motivated Electrician's Guide to Understanding ANY PLC System."


New to PLCs?
You can breeze through this cheat sheet in about 10 minutes and get a solid understanding of the big picture of how PLCs work. Perfect place to start.
Recent Posts