Modbus Communications: Getting Started

If you're serious about becoming a confident PLC programmer then you have probably heard of Modbus. And if you haven't...that's ok because you are about to.
Modbus is an old industrial communications protocol that allows for the transmission of data among PLCs and/or other industrial devices.
Believe it or not, this protocol has been in use since 1979!
It has obviously stood the test of time. This is most likely because of how simple it is to use and the fact that it is open source. Meaning company or individual can build-in Modbus communications into their PLC products or other industrial devices
For example, let’s say you have basic building thermostat that you need to connect to your PLC, (there are some thermostats available with Modbus). Let’s say you need to monitor the temperature in the room and display it on an HMI screen.
Also let’s say we want to be able to see when the thermostat is calling for heat or cool.
If the thermostat has extra discrete and analog outputs, we could just use a hard-wired analog signal from the thermostat to a PLC analog input module to read the room temperature and we could use a contact from the thermostat to a PLC discrete input module to monitor when the thermostat is calling for heat.
But we can also leverage Modbus communications to get everything we need over one communication cable. And this becomes even more valuable if we needed to get more data from the thermostat such as humidity level or a high temperature alarm.
With Modbus, we can send hundreds of different monitoring values and even control signals between the PLC and the Thermostat. We don’t have to use extra wires and relay contacts. Just one shielded pair of wires (usually) or an ethernet Cat 5 cable will do the job.
So that’s the purpose of Modbus and other communications protocols. To send and receive data between two or more devices without having to run a ton of wires and relays between the devices.
One more thing I want to tell you about Modbus before we wrap up this intro:
Modbus has only two basic data types, registers and coils.
A register is just 16-bit unsigned integer and a coil is just a single bit (1 or 0).
So continuing with our thermostat example, if we wanted to read whether the thermostat was calling for heat we use the PLC could read a single coil that was either 1 (calling for heat) or 0 (not calling for heat).
And reading the room temperature from the thermostat would mean we could use the PLC to a 16-bit register that stores the temperature.
You can use 16-bit registers to represent decimal numbers. For example, if the temperature was 75.2 degrees in the room, the thermostat might be designed to communicate that via the 16 bit register might as follows: remove the decimal point by multiplying the 75.2 x 10 and then: 752 = 0000000001001011
So then, when the PLC reads all those 1’s and 0s above, it converts them to the decimal value, 752.
And then we can use math instructions in the PLC to divide by 10 and get 75.2 degrees at the PLC which we can easily display on the HMI.
Pretty simple right?
(Here's a free resource sheet for you!)
Click here to get the Modbus resources.
MODBUS VIDEO - GETTING STARTED
Prefer to read it? Go Ahead…:
Hey guys, Stephen Gates here from myPLCtraining.com with another video to help you become a confident PLC programmer.
Today we are talking about Modbus, and I think you’re going to like this.
Modbus is an old industrial communications protocol that allows for the transmission of data among PLCs and/or other industrial devices.
Believe it or not, this protocol has been in use since 1979!
It has obviously stood the test of time. This is most likely because of how simple it is to use and the fact that it is open source. Meaning company or individual can build-in Modbus communications into their PLC products or other industrial devices.
In this video we are going to use simple example of how you could use Modbus to gather data from a thermostat into the PLC and then pass it on to the HMI. Now this example builds an example I sent out in an email recently to my subscribers. And by the way if you’d like to make sure you get those emails when they get sent out, you can sign up for our newsletter and get free cheat sheet by clicking the free PLC cheat sheet link
So in our example we said we want to read the room temperature and whether the thermostat is calling for heat. And we also want to send a signal to thermostat once a day to turn on a fan that it controls for 1 hour.
So we are going to actually to use a modbus configuration tool from Prosoft.
The module we are going to use is a PLX31-EIP-MBS. Now there’s hundreds of different modbus devices we could use to read our thermostat but Prosoft is great for people learning Allen-Bradley PLCs because Prosoft is an encompass partner with Rockwell and therefore they have a lot of great products integrate seamlessly with Rockwell and Allen-Bradely controllers
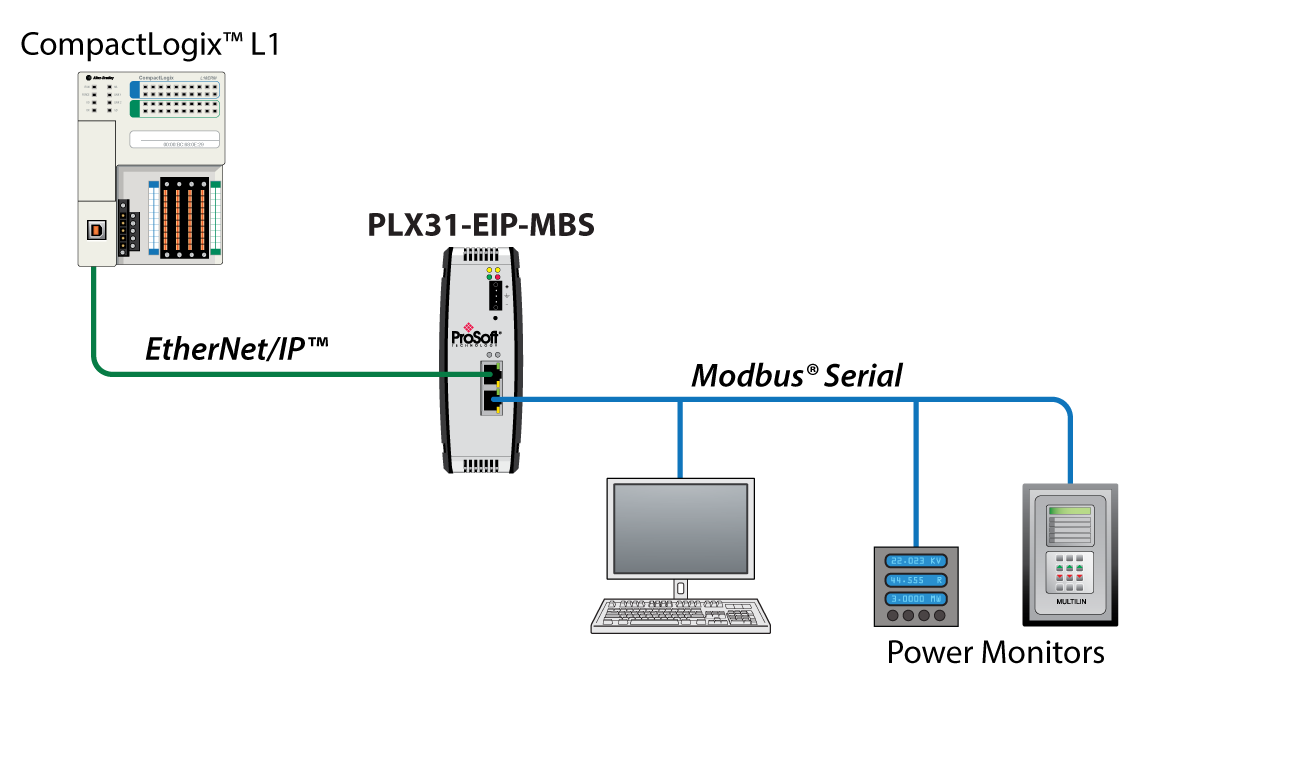
So here in this image from the Prosoft site you can see that it shows the PLX31 connected to a CompactLogix PLC via EtherNet/IP and then connected to 3 other devices via Modbus serial.
Devices like this are usually called communication gateways. Because as you can see they provide a gateway from one type of comm protocol to another.
One thing I should clarify is that A-B PLCs do NOT communicate via modbus natively. In other words you need a third party device like the PLX31 gateway from ProSoft to convert modbus data into something A-B PLCs understand. In this case: Ethernet/IP.
Ok so now let’s take a look at how to set up some modbus commands to talk to thermostat we introduced earlier.
Prosoft Configuration Builder Software
So here we are inside ProSoft Configuration Builder. And we have a new project pulled up. So the first thing we need to do is add ProSoft module to the project.

So right click the default location and click Add Module.
As I said, our example is going to be based on the PLX31-EIP-MBS, so let’s find the plx30 series here and then search for the exact module in this pull down menu.
And there’s the PLX31-EIP-MBS, so we select and click ‘OK’.
So no we have a PLX31-EIP-MBS added to our tree here on the left. And this looks kind of like our I/O tree in Studio 5000 Logix Designer.
So the main thing we will be working with here is setting up our Modbus commands. So let’s open the MBS port. In this case MBS stands for Modbus. So expand it and then choose Modbus Port 1.
So there’s a couple really important settings here that we need to select. The first is whether the port is even enabled to communicate. So obviously we need to choose ‘yes’. Next we need to choose the interface type.
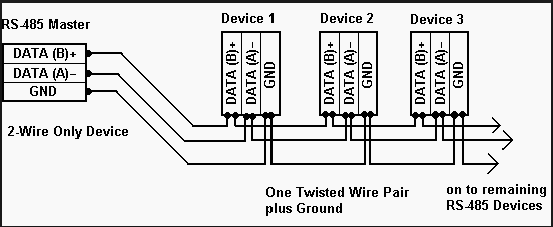
By default it has RS-232 selected. But most Modbus RTU devices are set up to communicate over RS-485. RS-232 only works if you need to communicate with just one device. IT’s called a point to point protocol meaning you can only communicate between two devices. 1 Master and 1 slave.
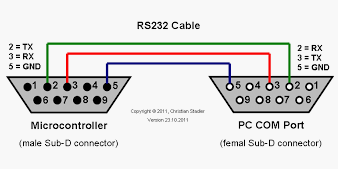
It typically uses a 9 pin serial cable which as a side note, all older computers used to have a 9 pin serial port but you rarely see that on PCs now.
Anyway, all that to say let’s choose RS-485 instead.
Next, we have Type. And this can be either Master or Slave.
In this case we want the Prosoft to be in charge and talking to the Thermostat. So choose ‘Master’.
Skip Enron-Daniels. Truthfully, I don’t even know what that does :)
Next, let’s verify that Protocol is set top RTU and not ASCII
Ok, another big one is the Baud Rate. This is really important for RS-485 networks. Baud rate is just the speed of the connection. It’s how many bit/second will transferred.
As you can see there are several baud rates available.The Prosoft gateway has tons of options but not all slave devices can have all these baud rates. So you just need to make sure the PRosoft module is set to be the same as your slave device. Now generally the faster the baud rate the better but that’s always the case. I usually go with a 19200 if the slave device can support it. Or 38400 at the most.
And you really don’t want go slower than 9600 cause they just gets painfully slow.
So I’m using a thermostat as an example for this video and if we look at the manual for this thing
on page 2, we can see that it supports several baud rates. And it does indeed support 19200 so we will just select that in our Prosoft configuration.
The next three items I usually leave at the defaults but again these need to match your slave devices. So just make sure whatever slave device you’re trying to talk to has these following settings setup the same.
Ok the rest of these settings can usually be set at defaults and are a little more advanced so we are going to skip those and move onto setting up actual Modbus commands.
You can always look in the manual for the PLX31 to learn more about those settings.
So let’s hit ok and get out of that.
Next, let’s open Modbus Port 1 commands. Here we have a blank slate. So to start let’s add a row so we can create our first command.
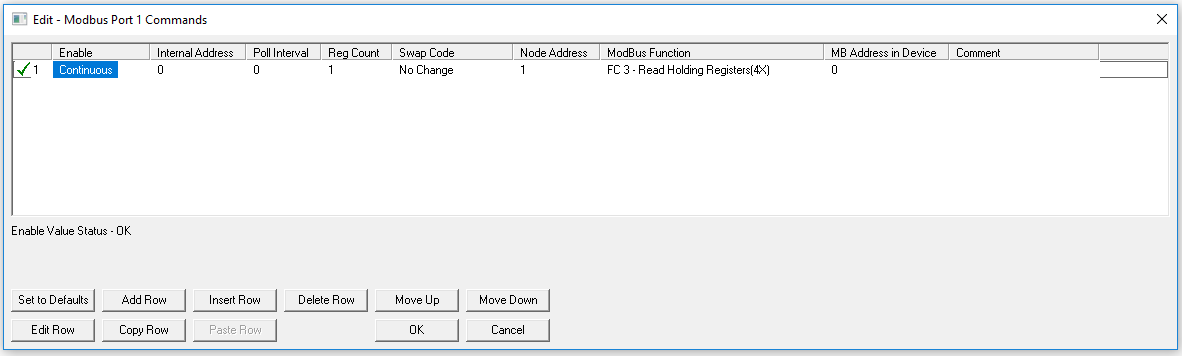
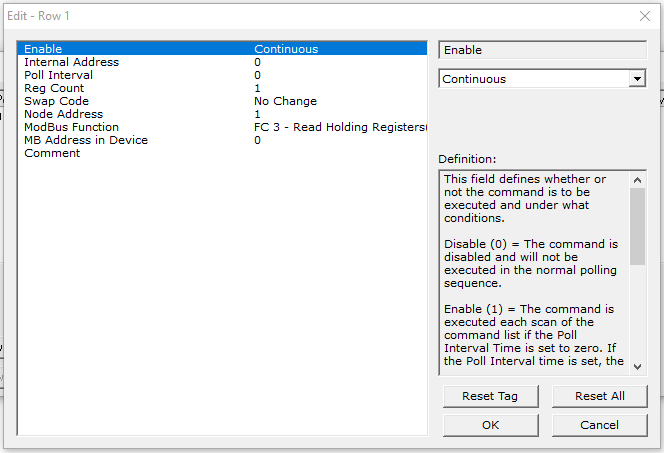
So we have several columns here and we will go step by step. So first we have our enable setting. This is one is super simple. Basically we are just setting whether the command is on or off, enabled or disabled. However when it’s enabled we can set it to be running continuously or only conditionally depending on the status of the internal data. That’s a bit more complicated to cover here so feel free to read the manual if you want to know more about conditional or event commands.
Next, we have internal address. Now this is where the data is being stored in the Prosoft module. So just to give you a quick idea of how this works. If we are reading some Modbus values from a thermostat or something we need a place to put those values into. So for example if we are reading the room temperature from the thermostat we could put that value into internal address 0. I usually like to put the data from my first command into internal address 0 onward.
Then the PLC can read the value out of register 0 from the Prosoft.
Ok, the next item is Poll interval. This is just how often this command will execute. This is entered in seconds. So if you want to execute as quickly as possible leave it at zero.
Next we have register count which determines how many registers we want to read from the our slave device. This only applies if you have several values you want to read or write to that are all in consecutive order.
Next is swap code. This is a little more advanced feature that allows to swap the order of the
because usually the data I want to read data a slave device is analog data. In other words, data other than just 0 or 1. But sometimes you also need to use function code 4 to read input registers which are similar to holding registers but can only be read from not written to.
So let’s look at the manual for our Thermostat again and see what we need to use for that…
Starting on page 15 there’s a Modbus register map we can use to determine which values we want to read from the thermostat. In order to keep this video from getting too long we are only going to focus on getting one value out of the thermostat. The room temperature. So read around in this manual a little bit to determine which register we would need to read from the thermostat to get the room temp and it turns out we need register 100 which is the “built in temperature measurement” value.
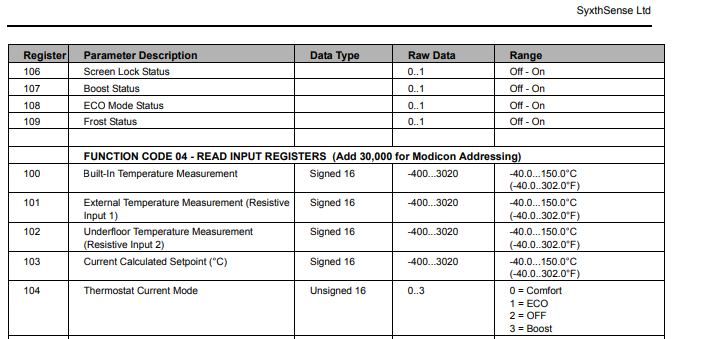
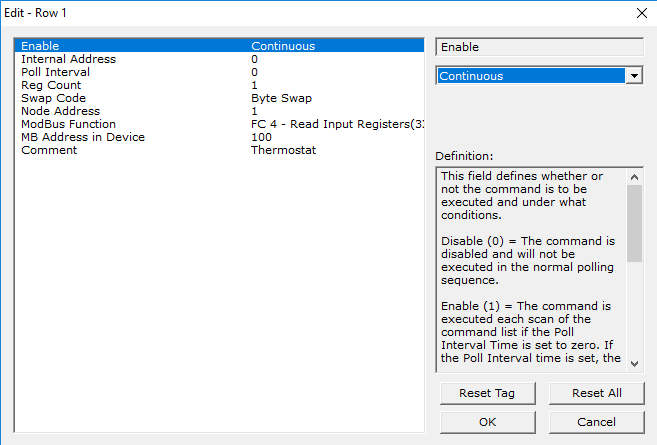
So in the prosoft configuration again, we choose Modbus function FC 4 read input registers and then in the MB address in device. This is where we enter the modbus address of the thermostat that we want to read. Which is 100.
Then we can add a comment here to just describe what this command does.
Alright that’s it for this lesson! Hope you enjoyed and learned something about Modbus. We’ll see you in the next video.
I hope you enjoyed the video intro to Modbus
This week I have a free resource for you if you want to learn more about Modbus.
I put together a list of the best free Modbus training I could find. I think it’s the best because it’s a combo of simple, clear training and also some resources to help you go deeper.
I also include links to a couple free software Modbus tools you can install on your computer today.
Hope you enjoy it!
Thanks for reading. I'll talk to you again soon.
Here's how I can help further...
- Check out our blog for more free articles and videos on PLCs and automation
- Need PLC/PAC/HMI training for yourself? Join the membership, myPLCtraining Academy.
- Need PLC/PAC/HMI training for your COMPANY? Schedule a free call with me to help you make a plan for training your team.
Get the Free PLC Cheat Sheet
PLCs are really not that complicated. If you are new to PLCs or just looking to get a better handle on how they work, check out this free cheat sheet, called the "Motivated Electrician's Guide to Understanding ANY PLC System."


New to PLCs?
You can breeze through this cheat sheet in about 10 minutes and get a solid understanding of the big picture of how PLCs work. Perfect place to start.
Recent Posts